You might remember that back in July I made a recording of the DME ground-to-air and air-to-ground frequencies for a nearby VOR-DME station. In that post, I performed a preliminary analysis of the recording. I mentioned that I was interested in measuring the delay between the signals received directly from the aircraft and the ground transponder replies, and match these to the aircraft trajectories. This post is focused on that kind of study. I will present a GNU Radio out-of-tree module gr-dme that I have written to detect and measure DME pulses, and show a Jupyter notebook where I match aircraft pulses with their corresponding ground transponder replies and compare the delays to those calculated from the aircraft positions given in ADS-B data.
Tag: aircraft
Recording DME with the LimeSDR
DME (distance measuring equipment) is an aircraft radio navigation system that is used to measure the distance between an aircraft and a DME station on ground. DME is often colocated with a VOR station, in which case the VOR provides the bearing information. DME works by measuring the two-way time of flight of pulse pairs, which are first transmitted by the aircraft, then retransmitted with a fixed delay by the ground station, which acts as a transponder, and finally received back by the aircraft. DME operates between 960 and 1215 MHz. It is channelized in steps of 1 MHz, and the air-to-ground and ground-to-air frequencies always differ by 63 MHz (here is a list of all the frequency channels).
I want to write a post explaining in detail how DME works by analysing a recording of DME that contains both the air-to-ground and the ground-to-air channels. Among other things, I want to show that the delay between the aircraft and ground station pulses matches the one calculated using the aircraft position (which I can get from ADS-B data on the internet), the ground station position, the position of the recorder, and the fixed delay applied by the ground station transponder.
Recording two channels 63 MHz apart is tricky with the kind of SDRs I have. Devices based on the AD9361 technically support a maximum sample rate of 61.44 Msps (although some people are running it at up to 122.88 Msps). The LMS7002M, which is used by the LimeSDR and other SDRs, is an interesting alternative, for two reasons. First, it supports more than 61.44 Msps. However, it isn’t clear what is the maximum sample rate supported by the LimeSDR. Some sources, including the LimeSDR webpage mention 61.44 MHz bandwidth, but the LMS7002M datasheet says that the maximum RF modulation bandwidth (whatever that means) through the digital interface in SISO mode is 96 MHz. In the case of the LimeSDR there is also the limitation of the USB3 data rate, but this should not be a problem if we use only 1 RX channel. I haven’t found clear information about the limitations of each of the components of the LMS7002M (ADC max sample rate, etc.).
The second interesting feature is that the LMS7002M has a DDC on the chip. The AD9361 has a series of decimating filters to reduce the ADC sample rate and deliver a lower sample rate through the digital interface. The LMS7002M, in addition to this, has an NCO and digital mixer that can be be used to apply a frequency shift to the ADC IQ signal before decimation.
I had two different ideas about how to use the LimeSDR to record the two DME channels. The first idea consisted in using a 70 Msps output sample rate. For this I used an ADC sample rate of 140 Msps, because I think it is necessary to have at least decimation by 2 after the ADC (the LMS7200M documentation does not explain this clearly, so figuring out how to use the chip often involves some trial and error using LimeSuiteGUI). This idea had two problems. The first problem is that some CGEN PLL occasionally failed to lock when using an ADC sample rate of 140 Msps. However the LimeSuite driver retried multiple times until the PLL locked, so in practice this wasn’t a problem. This approach worked well on my desktop PC, since in 70 Msps I had the two DME channels and then I could use GNU Radio to extract each of the two channels (for instance with the Frequency Xlating FIR Filter). However, the laptop I planned to use to record on the field couldn’t keep up with 70 Msps.
The second idea was to use the on-chip DDC in the LMS7200M to extract the DME channel and deliver a much lower sample rate over the digital interface. The figure below shows how the LMS7200M digital signal processing datapath works. This datapath is called RXTSP. The RXI and RXQ signals are the digital signals coming from the ADC (here and below, by ADC I mean a dual-channel ADC, since the LMS7002M is a zero-if IQ transceiver). The RYI and RYQ are the signals delivered to the digital interface of the chip. Since the LMS7200M has two RX channels, there are two identical chains, one for each channel. The parameters of each chain can be programmed completely independently.

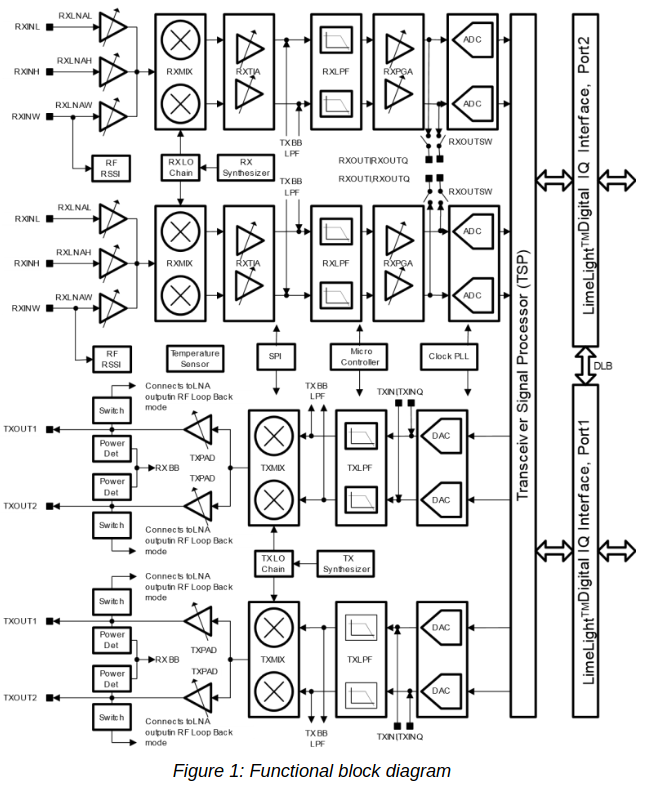
There is no way of sending the signal of one ADC to the two RXTSPs. The connection between each ADC and its corresponding RXTSP is fixed. Therefore, we need to feed in the antenna signal through the two RX channels, but we can easily do this with an external splitter. Remember that both of the LMS7200M RX channels share the same LO, as illustrated by the block diagram below. So the point here is to tune the LO to a frequency between the two DME channels, set the sample rate high enough that both DME channels are present in the ADC output, and finally to use each of the two RXTSPs to extract one of the DME channels, sending it at a low sample rate through the digital interface.
This approach has worked quite well. I have set the ADC to 80 Msps and used the RXTSPs to dowconvert and decimate the DME channels to 2.5 Msps, recording that data directly in GNU Radio.
I have done a two hour recording of DME and published it in the Zenodo dataset Recording of Colmenar (CNR) VOR-DME air-to-ground and ground-to-air DME channels.
In the rest of this post I explain the details of the recording set up and do a preliminary analysis of the recording quality.