As you may well know, on May 20 a CZ-4C rocket launched from Xichang, China, to deliver Queqiao, the Chang’e 4 relay satellite, to the Moon. Queqiao is a communications relay satellite designed to orbit the L2 point of the Earth-Moon system, supporting the future Chang’e 4 rover that will land on the far side of the Moon. From the L2 point, Queqiao has a good view of both the Earth and the far side of the Moon.
This launch was shared by the DSLWP-A and -B microsatellites, also called Longjiang 1 and 2. These two satellites are designed to be put on a 200 x 9000km lunar orbit and their main scientific mission is a proof of concept of the Discovering the Sky at Longest Wavelengths experiment, a radioastronomy HF interferometer that uses the Moon as a shield from Earth’s interferences.
The DSLWP satellites carry an Amateur radio payload which consists of a 250 baud (or 500 baud) GMSK transmitter which uses \(r=1/2\) or \(r=1/4\) turbo codes, a JT4G beacon, and a camera allowing open telecommand (such as the camera on BY70-1 and LilacSat-1). A year ago, while the radio system was being designed, I wrote a post about DSLWP’s SSDV downlink, which transmits the images taken by the camera.
Wei Mingchuan BG2BHC, who is part of the DSLWP team, has been posting updates on Twitter about the status of the mission. If you’ve been following these closely, you’ll already know that unfortunately radio contact with DSLWP-A was lost on the UTC afternoon of May 22. Since then, all tries to contact the spacecraft have failed (the team will publicly release more information about its fate soon). On the other hand, DSLWP-B has been successfully injected into lunar orbit and is now orbiting the Moon since the UTC afternoon of May 25.
More posts will follow about the radio communications of DSLWP, but this series of posts will deal with the orbital dynamics part of the mission. In this first post, I will look at the tracking files released so far by Wei, which can be used to compute the spacecraft’s position and Doppler.
The main tool I will be using is GMAT R2018a, which is an open-source tool designed to plan, analyse and model spacecraft trajectories. It is a very comprehensive tool developed by NASA and other partners. I have been introduced to GMAT by Nico Janssen PA0DLO, who has proposed it for tracking of Amateur deep space missions. See Nico’s page for some useful resources regarding GMAT and deep space tracking, including some scripts for DSLWP.
While I know the basics of orbital dynamics (dating back to my years of playing Orbiter), I’m far from an expert on the field, and I had never used GMAT before, so I’m learning as I go. I hope that these series of posts can help others to get introduced to this very interesting topic.
GMAT has a very nice series of tutorials, which get you from the very basics to rather complex topics. I suggest you to go at some point through the first tutorial to get a hang of GMAT’s workflow and general concepts.
So far, three tracking files have been released by Wei, the first one is included in gr-dslwp, the GNU Radio decoder for the GMSK telemetry, and was released on May 21. The second and third have been released today.
These tracking files are plain text files which contain a listing of the spacecraft’s position and velocity at specific moments in time. Each line contains the data for a different instant. There are seven columns in each line. The first column contains the date and time in Unix timestamp format (seconds since January 1 1970). The three next columns contain the position in ECEF coordinates. The units are km. The last three columns contain the velocity in ECEF coordinates, in units of km/s. There is a line for each second (the timestamp increases one second per line).
ECEF coordinates are a cartesian reference system with origin on the Earth’s centre and which is “fixed” to Earth, so it rotates together with Earth’s rotation. In this manner, points fixed on the Earth’s surface have constant ECEF coordinates (i.e., their coordinates do not vary with time, as Earth rotates), so it is possible to pass from latitude and longitude to ECEF. The Z axis of ECEF coordinates points to the north pole, the X axis points to the point with latitude 0º and longitude 0º, and the Y axis is chosen to form a right-handed system.
There is a different type of coordinates, which are known as ECI or inertial coordinates. Their origin is also the Earth’s centre, but they do not rotate with the Earth. The Z axis of ECI coordinates also points to the north pole, but the X axis points to the vernal equinox (the intersection of Earth’s ecliptic and equatorial planes, in the direction of Aries).
In many applications, ECI coordinates are more useful than ECEF. For instance, in the case of DSLWP, ECI coordinates can be easier to interpret. In ECEF coordinates it seems that DSLWP orbits the Earth roughly one time per day, while in reality it is the Earth the thing that rotates. On the other hand, ECEF coordinates simplify somewhat the calculation of azimuth, elevation, distance to the spacecraft and Doppler for an observer on a fixed point on Earth, so probably that’s the reason why DSLWP tracking files are given in ECEF coordinates, since they are used in the GNU Radio decoder for that purpose. ECI coordinates are also useful because Newton’s laws can only be applied in an inertial reference frame.
Now that we’ve understood DSLWP tracking files, the main goal of this post is to interpret and validate them using GMAT. If you’ve already taken a look at the first tutorial, you’ll have seen that GMAT’s most basic functionality is trajectory propagation. Essentially, you give a spacecraft’s orbital elements, which are its position and velocity at a particular instant in time (for instance using ECEF or ECI coordinates, but other ways are possible) and tell GMAT to propagate the trajectory of the spacecraft for a certain time. GMAT will calculate the forces acting on the spacecraft (mainly gravity, but also others such as solar radiation pressure and atmospheric drag) and will update and propagate the position of the spacecraft by using Newton’s second law.
Thus, we will take each of the tracking files and use the first listed position and velocity as the spacecraft’s orbital elements in GMAT. Then we will use GMAT to propagate the trajectory of the spacecraft and compute its position every second. Finally we compare GMAT’s results with the tracking file. To do so, we can use GMAT to generate a file similar to the tracking file, with the position and velocity in ECEF coordinates. The only difference is that GMAT doesn’t use the Unix timestamp format, so we output time in UTC Modified Julian Days (note that GMAT’s MJD convention is different from the usual MJD convention). To compare GMAT’s propagation with the tracking file, we use Python to calculate and the position error (the distance between the position as predicted by GMAT and the position given by the tracking file).
This serves two purposes. First, we can validate that the published tracking files do not contain any planned manoeuvres, where the spacecraft fires its thrusters to change course (in which case we would also need to inform GMAT of those manoeuvres). Second, we can compare the force models used by GMAT with those used to compute the tracking files. As we shall see, there are many subtle details regarding the forces acting on a spacecraft.
There are two ways of running calculations with GMAT. The first one is to create a
Since I’m going to process three tracking files (and perhaps more that get published in the future), I have wanted to automate the procedure as much as possible. Therefore, I use Python to read the tracking file and create a GMAT script file using some data read from the tracking file (the spacecraft’s orbital elements, for instance). While this can seem hard, it is actually not that difficult. I have first created a mission using the GUI and then have used the corresponding script file as a template.
The Python code used in this post can be found in this Jupyter notebook.
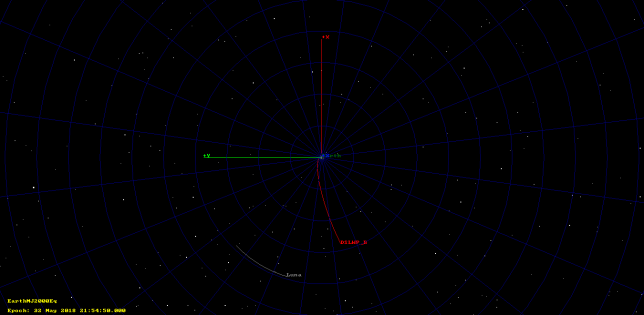
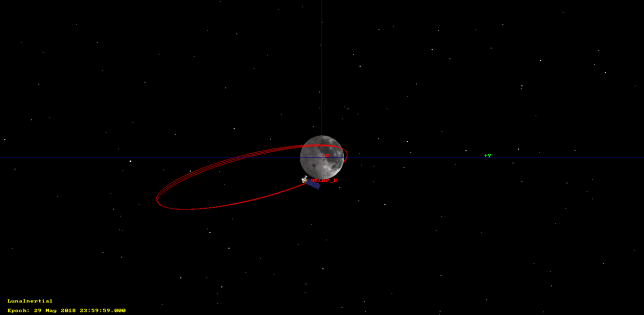
The first tracking file starts at 20 May 21:54:51 UTC and last 48 hours. It contains data from shortly after trans-lunar injection to before mid-course correction, which was programmed at 22 May 22:55 UTC, but was presumably delayed. The image below shows the orbit as propagated by GMAT (click on the image to view it in full size). Note that this orbit is plotted using ECI coordinates. The orbit in ECEF coordinates would look rather weird.
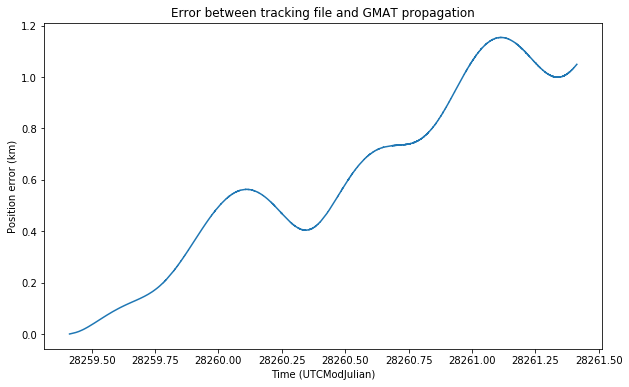
Below we can see the error between GMAT’s propagation and the tracking file. We see that it is small. This error is due to different modelling of the forces acting on the spacecraft. In GMAT I have used a very detailed model (probably an overkill) which simulates Earth’s non-spherical gravity using spherical harmonics up to degree and order 10 (see below for a discussion about spherical harmonics), point mass gravities for the Sun, Moon, and all the planets except for Mercury and Pluto (which are very small and distant), solar radiation pressure, relativistic effects, and Earth’s atmosphere (even though it is of little significance, since the spacecraft gets away from the atmosphere really soon).
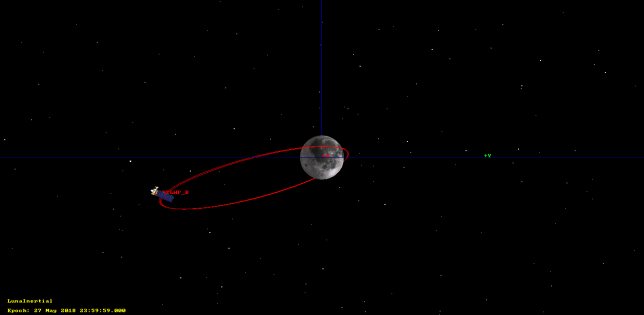
The second tracking file starts at 26 May 00:00:00 UTC and lasts 48 hours. It contains data after DSLWP-B was established on a lunar elliptical orbit.
Below we can see the error between GMAT’s propagation and the tracking file. Again, I have used a very detailed force model in GMAT. The model is is the same as before, but using the Moon’s spherical harmonics instead of those of Earth’s, since now the Moon is the nearest object. Also Earth’s atmosphere is not included now.
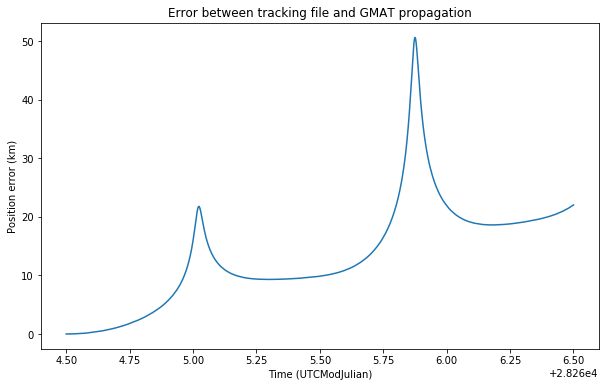
Now we see that the error is rather large, peaking up to 50km at times. These peaks corresponds to the times when DSLWP-B passes the periapsis (the point of the orbit which is nearest to the Moon). Recall that an object on an elliptical orbit moves faster at the periapsis and slower at the apoapsis (the point of the orbit which is farthest from the Moon), because of Kepler’s second law. Since DSLWP-B is on a highly elliptical orbit, it passes the periapsis very quickly and spends most of its time near the apoapsis.
Therefore, if there is a small difference between the orbital calculation on GMAT and in the calculations used to obtain the tracking file, that difference will cause DSLWP-B to pass the periapsis at slightly different times. This causes a large error in the position of the spacecraft when passing near the periapsis.
Another effect that we see in the graph is that there is an error that accumulates with every orbit. We will study this in more detail later.
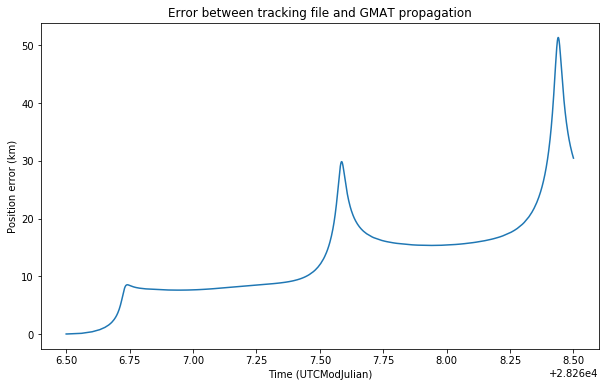
The third tracking file starts at 28 May 00:00:00 UTC and lasts 48 hours. It is just a continuation of the data in the second tracking file.
The figure below shows the position error. We have used the same force model in GMAT as for the second tracking file. We see the same behaviour as before.
The large errors seen in the second and third tracking files seem to indicate that a different force model has been for the calculation of the tracking files. To investigate this, I have run again the second file in GMAT using a simplified model that only includes the gravity of the Moon with a variable number of spherical harmonics and the gravity of Earth as a point mass.
Without going into much detail about spherical harmonics, I can say the following. An object which is a perfect sphere generates the same gravitational field as a point mass (meaning a mass concentrated at a single point). This gravitational field is symmetric and only depends on the distance to the object, which is what Kepler’s laws and all other simple theories of orbital mechanics assume. However, planets and moons are not perfectly spherical, and also they do not have a uniform density. Therefore, their gravitational field deviates from the ideal symmetric field. At a large distance, all these deviations somehow even out and the gravitational field seems almost perfect. However, at shorter distances, the effects of these deviations can be more significant.
Spherical harmonic coefficients are a mathematical way to measure these deviations. They are numbers with an associated degree and order. The coefficients with the lower order play the largest role, while the effect of coefficients of higher order is very mild and can usually be ignored. Hundreds or thousands of spherical harmonic coefficients have been measured for the Earth’s gravitational field and other astronomic bodies, including the Moon. The most important coefficient is the one having degree 2 and order 0. This coefficient describes the oblateness of the body, and it is the coefficient that plays the largest role in the non-spheric gravitational field.
It has been necessary to include the Earth in this simple model, since otherwise the error quickly grows and becomes very large, due to the fact that the Earth’s gravity plays a very important role in lunar orbits. This is not surprising since the Earth is a rather massive and near object. Checking this with a simulation in GMAT is left as an exercise for the reader.
Below we can see the errors obtained using models with a different number of spherical harmonics for the Moon’s gravity, and also the error obtained above using the complete model.
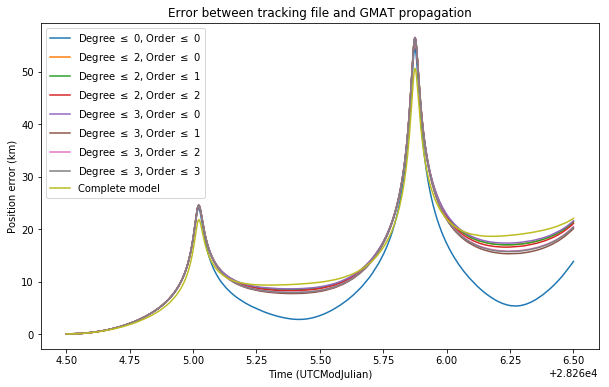
The error is much lower when no spherical harmonics are considered. This indicates that the calculations in the tracking files haven’t even taken the Moon’s oblateness into account. This will give an error in the tracking files that accumulates with each orbit.
The error when passing the periapsis is large in all the models I’ve used. I do not know what is the reason for this. Probably there is some peculiarity about the model used for the tracking files that I haven’t considered. It would be interesting to know how they are calculated. Wei tells me that the team uses STK for orbit calculations.
Update: People interested in using the GMAT output reports generated by this Jupyter notebook as tracking files for gr-dslwp can use the following Python script. It reads a GMAT report from the standard input and writes the corresponding tracking file to the standard output.
… fantastic. Thank you so much Dani.
73 Mike DK3WN
Fun-tastic Go Moon !
Hello, gmat and other soft are superb but confusing
I just need
to know when the probe is visible from my location,
at minimum distance from good old planet earth…
Some website ny2o style?
Brief answer if you don’t want to get into technical details: DSLWP-B is visible whenever the Moon is visible from your location (except for the brief time it spends in eclipse).
Nice…!
but the actual distance must be calculatted I presume ?
how much time, the moon orbit ?
(I’m a total newb into space!)